


Disney’s Frozen was a blast to watch, and even now I love singing Let it Go on long road trips. So when my friend Jessi asked if I could create an Elsa dress for her, I couldn’t say no! The reveal of Elsa’s ice dress was one of my favorite parts of the movie!
The Skirt
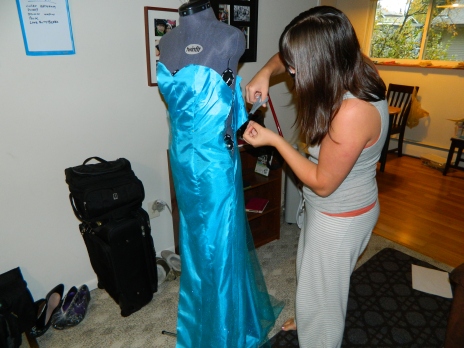
I started with the skirt. Rather than compicating an already involved design, I opted for simplicity. For the fabric, I chose a basic polyester with silky sheen and lay over it with colored glitter tulle. Initially, I expected the two fabrics to create a ripple effect, but sadly they just didn’t flow how I wanted them too. More on that later.
Instead of creating the skirt and bodice separately, I crafted the silky polyester into a full length dress that lay beneath both the bodice and the glitter tulle, Beneath the bodice, the dress functioned like a lining, while at the same time making the costume one continuous piece. It was a great idea, and I was happy with how it turned out.
It was the knee high slit in the skirt that was the most difficult. Because I was using two fabrics, it was important that the slit sat comfortably without pulling or bunching. It was frustrating, and althought I did finally work it into something that looked great, I think something will need to change in my next attempt.
All in all, I liked how the final product turned out, but there are a lot of things I’ve changed in the design. For the the next version of the costume, I’ll use a slightly heavier fabric for the skirt — with more “swing and sheen” — that won’t wrinkle quite as easily, and I’ll lose the glitter tulle; it was a nice thought that just didn’t translate well into the costume. Otherwise, the fit and look were great! In conclusion, I’d give the skirt a 7 out of 10, but I expect the next version to be aces.
The Bodice
This was easily the most difficult element of the dress — no surprise. When looking at the design from the movie you quickly realize that the animators used some effects to create depth that simply isn’t possible in the real world. That meant that I had to design a bodice that was different, but inherently recognizable. Trust me, it sounds easier than it actually is.
My first thought was to use sequin tape to recreate the look from the movie, but first I had to create a base to stick it to. Since it was going to be covered up, I chose a simple sweetheart cut corset pattern and a thick canvas-esque fabric in light blue.

The fabric, boning, and interfacing all came together perfectly. For strength, I used a regular zipper rather than an invisible zipper, and made a quick flap to cover the zipper pull.
Finally, it was time for the sequin tape! I ordered several yards of different colors from a fantastic online store. It was a lot of work to cut out, but with a little enlisted help from my husband and a close friend, it wasn’t so bad.

Of course, cutting it out ended up being the easy part. In order for the tape to stick to the corset, I had to use non-tack, clear, spray-on glue. It wasn’t until I was done that I realized “clear” must be a relative term in the glue world; half of my tape looked ruined! My husband suggested an adhesive remover, and after several grueling hours of scrubbing, it finally returned to its former glittery self.

Maybe it was just because of all the effort I’d put into it, but the bodice actually looked nice as it sat upon my dress form. I almost managed to ignore the peeling and fading and complete lack of depth, but all those issues rushed back when I brought it to Jessi to try on. It looked like duct tape. *sigh*. Back to the drawing board.
I tore the tape off in a caffine-fueled rampage. Here I was, back to just the corset. What could I try next? After some time searching online, I found a tutorial on deviantart (link) in which the costumer used glitter foam. Looked good to me!
I looked at a few craft stores, but ended up finding the right color of design foam at Michael’s. Well, I should say I found the almost right color; I wanted two shades — bright blue and silver blue — but could only find bright blue and regular silver. In order to give the silver a bluish tint, I sprayed it with a light layer of blue glitter blast spray paint.

I originally bought three sheets of each color, but didn’t quite use all of it. For each color, I cut two sheets into 2″ x 1″ rectangles and split the other sheet between 1″ x 1″ squares and 1″ by .5″ rectangles. I had plenty of the smaller cuts left over, but could have used a few more 2″ by 1″ rectangles.
Before I attached the foam to the corset, I wanted to get a feel for the design pattern. Once I was confident in how it would look, I began gluing them to the fabric. With foam, hot glue always works best since it slightly melts the back of the foam for a totally permanent adhesion. Even for the foam that had peel away stick backing (cool!) I still used hot glue. Be careful though, the hot glue destroyes the front of the foam if you accidentally drip any. To finish it all off, I sprayed a sealant over the foam and carefully glued strips of craft rhinestones to the bottom of the bodice.

The finished product looked GREAT! I loved how it turned out, and I doubt I’d change much for future incarnations of this costume. Using the design foam was easy, cheap, and a lot quicker than I’d expected. Plus it gave great color and depth. A definite 10 out of 10.
The Sleeves
Here is where my costume needs the most work. My original design, though good, didn’t take into account the weak mesh fabric I bought for the project.

I used the same fabric for the sleeves as I did for the cape — a light blue mesh — which you’ll find more about later in this post. I had to create my own pattern almost from nothing, since none of the pieces I could find at my local fabric store were in any way similar to the way Elsa’s sleeves connect across her chest and back.
From my pattern, I sewed together the top half of the sleeves, but left the bottom half open in order to paint the designs that run along the arms. For those embellishments I used silver glitter blast spray paint and diy stencils. Two layers of paint, a quick coat of sealant, and it’s good to go! I closed up the arms and thought it was done!

Not.
Sure, it looked awesome, but the fabric began pulling apart at the shoulders and elbows almost immediately. Turns out, the mesh wasn’t quite as sturdy as I’d hoped, and as the fabric pulled apart, the fit for the sleeves began to bag and bunch in horrid ways. Eventually I tried to bring in the seam, but it was only a temporary fix. Eventually, it all fell apart again, which seems odd considering the cape held together perfectly.
Unfortunately, I ran out of time for this particular commission, so rather than take a delay my friend decided to use a simple blue leotard as a replacement.
However, I did finish my design, and I’m excited to recreate the sleeves in the next version of this costume! I’ve decided to work with a reliable, slightly flexible fabric that is nearly as sheer as the mesh. The sleeves will attach beneath the bodice via a series of snaps, so that you can remove them separate from the rest of the dress.
All in all, the sleeves get a 3 out of 10. The concept was good, but a poor choice in fabric meant the whole thing was doomed from the beginning. Thankfully it’s a simple fix, and the next sleeves I create will be perfect!
The Cape
I think anyone who’s seen Frozen can agree that Elsa’s cape is the centerpiece of her costume, and I knew that to pull off this dress, I had to get it right.
Usually, a cape is fairly simple. You can find dozens of great patterns for any style, and attaching them is typically as easy as a quick stitch; however, Elsa’s cape does something unusual — it wraps around beneath her arms and flows out from within her bodice. It’s not a big deal, but the way it attaches definitely affects how the pattern needs to be put together. Plus the designs down the back of the cape would be destroyed by a misplaced seam, so rather than struggle to find the perfect pattern, I just created my own.
I sewed the cape together with a nice silver thread, that ended up clogging my machine a bit too often. I like the color, but I think I’ll choose a smaller weight next time to avoid the constant jamming.

Once I had the cape sewn together, I realized that the thread was bunching the fabric around the edges a bit. Since I didn’t want to risk burning the mesh by ironing it, I just stretched it out with some well placed pins and the carpet in our living room. Just letting it sit that way overnight was enough to stretch out the seams.

Finally, it was time to put on the design. Just like with the sleeves, I used silver glitter blast spray paint and diy stencils. Then I protected it with a coat of sealant to keep the silver from flaking off, and I was done! Well, almost. After finishing the bodice, I sewed the cape around the top inner seam. I was originally worried about accidentally dripping glue onto the cape, but next time I think I’ll sew on the cape first, then attach the foam tiles to the corset.

The final product looks INCREDIBLE! It’s my favorite part of this costume, and I’m looking forward to making many more! Definitely a 10 out of 10. I kept it moderately short (shorter than in the movie) so it could be worn more easily, but it still flows like a longer cape would. Beautiful!

Final Thoughts
Overall, the costume turned out great! Especially for a prototype! The mangled sleeves were disappointing, but even without them, the rest of the costume still looked great. Overall, I rank my first version of the Elsa dress as an 8 out of 10. I’m pleased with the final product — especially as it’s my first “official” cosplay for Cinderella’s Mice. It was a challenging and complex process, but I’m excited for all the wonderful Elsa dresses that I will be able to create from what I’ve learned here!

